news icon

WooCommerce EU VAT Assistant – Make VAT number optional when cart total is zero

Recently, we have been asked for a customisation for the EU VAT Assistant, to cover the following scenario:

  • The VAT number should be required to complete a purchase, if a payment has to be made.
  • The VAT number should not be required if the checkout doesn’t require a payment (i.e. if the cart total is zero). This could be the case if the customer only adds free products to the cart.

The above scenario is outside the scope of the EU VAT Assistant. The purpose of the “VAT number required” option is to force only B2B transactions. By making the VAT number required, only verified businesses can complete a transaction. By design, this rule applies whether the transaction requires a payment or not.

If you need to make the VAT number required only when a payment is needed, you can easily do so with a customisation. Your custom code will have to cover two elements:

  1. The validation of the VAT number on the checkout page
    When the field is set as “required”, the customer cannot go ahead with the checkout until such field is filled. For this part, we will rely on JavaScript to show or hide the VAT number field dynamically, as well as making it required, or not required
  2. The validation of the VAT number during the checkout process
    For this part, we will use a simple filter to verify if the VAT number should be required during the final checkout phase.

Now we have a plan, let’s get started.

Step 1 – Expose the cart total to the JavaScript frontend

The cart total is not easily accessible via JavaScript, as it’s not stored in the data returned by the Ajax requests triggered on the checkout page. Luckily, there is a convenient  filter that will allow us to add that information, called woocommerce_update_order_review_fragments. Our filter will be the following.

/**
 * Adds the cart total to the fragments returned as a response to the Ajax
 * requests on the checkout page.
 *
 * @param array fragments The fragments returned as a response.
 * @return array
 */
add_filter('woocommerce_update_order_review_fragments', function($fragments) {
  $fragments['_cart_total'] = WC()->cart->total;
  return $fragments;
});

Done. Now, every time the checkout form changes, we will have the cart total handy.

Step 2 – Get the cart total from the fragments, via JavaScript

Now that we have the cart total exposed to the JavaScript on the checkout page, we can use it to show or hide the VAT number field, as well as change its “required” status. For that purpose, we just have to add a simple script to the page footer.

/**
 * Adds a script to the checkout page, to make the VAT number required or not
 * required, depending on the cart total.
 */
add_action('wp_footer', function() {
  // We need to render our script only on the checkout page
  if(!is_checkout()) {
    return;
  }
  ?>
  <script>
  jQuery(document).ready(function($) {
    // Run the script every time the checkout form is updated. This will
    // allow us to check if the total changed
    $(document.body).on('updated_checkout', function(ev, data) {
      if(!data['fragments'] || !data['fragments'].hasOwnProperty('_cart_total')) {
        return;
      }

      var cart_total = parseFloat(data['fragments']['_cart_total']);
      var vat_number_required = (cart_total > 0);

      var $eu_vat_number = $('#woocommerce_eu_vat_number');
      // Show the VAT number is the cart total is greater than zero,
      // hide it otherwise
      $eu_vat_number.toggle(vat_number_required);
      // Make the VAT number required only if the cart total is greater than zero
      $eu_vat_number.find('.form-row').toggleClass('validate-required', vat_number_required);
    });
  })
  </script>
  <?php
});

With this script, we covered the checkout page. The VAT number will appear automatically when the cart total is greater than zero, and disappear when it’s not. Customers will be able to checkout without entering a number, if no payment is needed.

Step 3 – Make the VAT number optional during the checkout process

This is the last step, to allow the checkout to complete when the cart total is zero and the customer did not enter a VAT number. This filter is very simple.

/**
 * Sets the VAT number field as "not required" when the cart total is zero (or
 * less; which should never happen, but better to cover that case).
 *
 * @param bool is_vat_number_required Indicates if the VAT number is required.
 * @param string country The billing country selected at checkout.
 * @return bool
 */
add_filter('wc_aelia_euva_order_is_eu_vat_number_required', function($is_vat_number_required, $country) {
  // Make VAT number "not required" if the cart total is zero
  if($is_vat_number_required && (WC()->cart->total <= 0)) {
    $is_vat_number_required = false;
  }
	
  return $is_vat_number_required;
}, 10, 2);

That’s it. We covered the checkout process as well. The result will be the following:

  • When the cart total is greater than zero, the VAT number will be required. It won’t be possible to complete the checkout without entering it.
  • When the cart total is zero, the VAT number will be hidden, and optional. Customers won’t need to enter it.

You can find the complete code here: WooCommerce – Make VAT number optional if cart total is zero (Pastebin).

Need help?

Should you need assistance adding this custom code to your site, or if you need it tailored to your needs, you can hire us on Codeable. We will analyse your specifications and send you an estimate for your customisation.

Thanks for reading, and for using our EU VAT Assistant. See you soon for the next WooCommerce Tips & Tricks!

The Aelia Team

news icon

WooCommerce Tips & Tricks – Get all the categories to which a product belongs

As active contributors of several communities, such as the Advanced WooCommerce and WooCommerce Help & Share groups on Facebook, we came across a question that seem to be quite frequent.

How to get all of a product’s categories

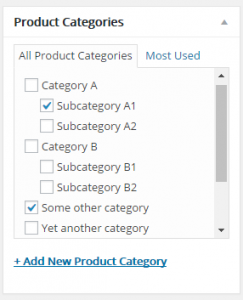
This operation is simple, it just requires a bit more work than one would expect. It’s very easy to fetch the categories to which a product is assigned directly, but a product may also belong to parent categories (a parent category is a category to which a subcategory belongs). The screenshot below explains the concept.

Product category hierarchy

In this example, the product belongs directly to “Subcategory A1” and “Some other category”. It also belongs indirectly to “Category A”, as “Subcategory A1” is a child of that category.

In the above example, the product belongs to the following categories:

  • Directly to Subcategory A1 and Some other category, as it’s assigned directly to them.
  • Indirectly to Category A, which is the parent of Subcategory A1.

Now that the concepts are clear, let’s get coding.

Step 1 – Get the direct categories of a product

This is the easiest part. It’s just a matter to find all the “category” terms associated to a product. Our function will look like this:

function aelia_get_product_categories($product, $return_raw_categories = false) {
  $result = array();
  // Get all the categories to which a product is assigned
  $categories = wp_get_post_terms($product->id, 'product_cat');
  
  // The $categories array contains a list of objects. Most likely, we would 
  // like to have categorys slug as a keys, and their names as values. The#
  // wp_list_pluck() function is perfect for this
  $categories = wp_list_pluck($categories, 'name', 'slug');
  return $categories;
}

The result of this function, once applied to our example product, will be the following:

array(
  'subcategory-a1' => 'Subcategory A1',
  'some-other-category' => 'Some other category',
)

All good, we have the categories to which the product is assigned directly. Now we need to get all the parent categories.

Step 2 – Get the parent category (or categories) of a given category

To keep things tidy, we will create a second function to get the parent categories of a category. This requires a similar approach to the one used for the products.

function aelia_get_parent_categories($category_id) {
  $parent_categories = array();
  // This will retrieve the IDs of all the parent categories 
  // of a category, all the way to the top level
  $parent_categories_ids = get_ancestors($category_id, 'product_cat');
  
  foreach($parent_categories_ids as $category_id) {
    // Now we retrieve the details of each category, using its
    // ID, and extract its name
    $category = get_term_by('id', $category_id, 'product_cat');
    $parent_categories[$category->slug] = $category->name;
  }
  return $parent_categories;
}

The above will return the following result for Subcategory A1:

array(
  'category-a' => 'Category A'
)

As before, we have a list with category slugs as keys, and category names as values. Time to finish the job.

Step 3 – Putting the pieces together

Now that we can get both the direct categories of a product and their parent categories, we can alter the first function to call the second and give us a result that includes all the categories. The modified function will look as follows:

function aelia_get_product_categories($product, $return_raw_categories = false) {
  $result = array();
  $categories = wp_get_post_terms($product->id, 'product_cat');

  if(is_array($categories) && !$return_raw_categories) {
    $parent_categories = array();
    // Retrieve the parent categories of each category to which
    // the product is assigned directly
    foreach($categories as $category) {
      // Using array_merge(), we keep a list of parent categories
      // that doesn't include duplicates
      $parent_categories = array_merge($parent_categories, aelia_get_parent_categories($category->term_id));
    }
    // When we have the full list of parent categories, we can merge it with
    // the list of the product's direct categories, producing a single list
    $categories = array_merge($parent_categories, wp_list_pluck($categories, 'name', 'slug'));
  }
  return $categories;
}

As you will probably have guessed, the new function will return the following result:

array(
  'subcategory-a1' => 'Subcategory A1',
  'some-other-category' => 'Some other category',
  'category-a' => 'Category A',
)

That is, a list of all the direct and indirect categories to which a product belongs. Mission accomplished!

For your convenience, you can find the complete code here: WooCommerce – WooCommerce – Get product categories, including parent categories (Pastebin).

Need help?

Should you need help implementing the solution, or if you would need to have the category search functions implemented as part of a more complex custom project, please feel free to contact us. We will review your specifications and give you a quote for your customisation.

The Aelia Team

news icon

WooCommerce Tips & Tricks – Only allow specific product combinations in cart

This post was written in December 2015. Based on our tests, the code works with with WooCommerce 2.5 and 2.6. Please keep in mind that the code example are provided “as is”, without explicit or implicit warranties. You might have to adjust the code to make it work with your specific configuration.

Update – 01 March 2018

You can find a link to the code for WooCommerce 3.x at the bottom of the article. 

A member of the Advanced WooCommerce group on Facebook presented an interesting challenge. She needed to allow customers to purchase any products freely, except in one case. She had a specific product (let’s calls it Product X) that had to be purchased “alone”, without any other product being present in the cart. In short:

  • If Product X is in the cart, that must be the only product in the cart.
  • If Product X is not in the cart, any other product can be added to it and purchased at the same time.

Our friend Rodolfo, from BusinessBloomer, posted a solution that he adapted from his solution to allow only one product to the cart. It works, but in our opinion, that approach presented a few limitations:

  1. It works by emptying the cart when Product X is added after the other products. If a customer adds Product X to the cart, then he can add other products, and they will stay there.
  2. It doesn’t allow to have combinations of products (e.g. Product X and Product Y allowed together).
  3. It doesn’t make clear to the customer that other products cannot be purchased together with Product X (all products retain their “Add to cart” button, even if they should not).
  4. It empties the cart explicitly. We try to avoid this type of calls whenever possible, and rely on WooCommerce’s internal logic to decide what items should be removed, and when.

Our approach

Taking advantage of the experience gained with the development of our Prices by Country plugin, we prepared a different solution, which, in our opinion, is more flexible and user friendly. It brings the following advantages:

  • It covers the requirement described above, where a specific product (e.g. Product X) must be the only one in the cart.
  • It also allows to have more than one product allowed in the cart (e.g. Product X and Product Y), while excluding all others.
  • It clearly informs the customers that some products can’t be purchased anymore.

You can find it below, described step by step. The code can be added to the theme’s functions.php, or packaged in a plugin, if needed. It has been tested with WooCommerce up to version 2.5.

Step 1 – Keep track of what’s in the cart

The first thing to do is to determine what is in the cart. The content of the cart will dictate what else can be added to it. We do this operation only once per page load, for better performance.

/**
 * Retrieves the cart contents. We can't just call WC_Cart::get_cart(), because
 * such method runs multiple actions and filters, which we don't want to trigger
 * at this stage.
 *
 * @author Aelia <support@aelia.co>
 */
function aelia_get_cart_contents() {
  $cart_contents = array();
  /**
   * Load the cart object. This defaults to the persistant cart if null.
   */
  $cart = WC()->session->get( 'cart', null );

  if ( is_null( $cart ) && ( $saved_cart = get_user_meta( get_current_user_id(), '_woocommerce_persistent_cart', true ) ) ) {
    $cart = $saved_cart['cart'];
  } elseif ( is_null( $cart ) ) {
    $cart = array();
  }

  if ( is_array( $cart ) ) {
    foreach ( $cart as $key => $values ) {
      $_product = wc_get_product( $values['variation_id'] ? $values['variation_id'] : $values['product_id'] );

      if ( ! empty( $_product ) && $_product->exists() && $values['quantity'] > 0 ) {
        if ( $_product->is_purchasable() ) {
          // Put session data into array. Run through filter so other plugins can load their own session data
          $session_data = array_merge( $values, array( 'data' => $_product ) );
          $cart_contents[ $key ] = apply_filters( 'woocommerce_get_cart_item_from_session', $session_data, $values, $key );
        }
      }
    }
  }
  return $cart_contents;
}

// Step 1 - Keep track of cart contents
add_action('wp_loaded', function() {
  // If there is no session, then we don't have a cart and we should not take
  // any action
  if(!is_object(WC()->session)) {
    return;
  }

  // This variable must be global, we will need it later. If this code were
  // packaged as a plugin, a property could be used instead
  global $allowed_cart_items;
  // We decided that products with ID 737 and 832 can go together. If any of them
  // is in the cart, all other products cannot be added to it
  global $restricted_cart_items;
  $restricted_cart_items = array(
    737,
    832,
  );

  // "Snoop" into the cart contents, without actually loading the whole cart
  foreach(aelia_get_cart_contents() as $item) {
    if(in_array($item['data']->id, $restricted_cart_items)) {
      $allowed_cart_items[] = $item['data']->id;

      // If you need to allow MULTIPLE restricted items in the cart, comment
      // the line below
      break;
    }
  }
});

Step 2 – Prevent disallowed product combinations

Now that we know what’s in the cart, we can prevent some products from being added to it if any of the “restricted” products are present. Emptying the cart would not work, as we would risk to throw away one of the allowed products. Instead, we simply make the disallowed products unavailable. This will have several effects:

  • If any of the disallowed products is already in the cart, WooCommerce will remove it.
  • The Add to Cart button will be replaced by a Read More button on the disallowed products. Customers won’t be able to add the products back, and will instead get a note explaining that they cannot be purchased.
// Step 2 - Make disallowed products "not purchasable"
add_filter('woocommerce_is_purchasable', function($is_purchasable, $product) {
  global $restricted_cart_items;
  global $allowed_cart_items;

  // If any of the restricted products is in the cart, any other must be made
  // "not purchasable"
  if(!empty($allowed_cart_items)) {
    // To allow MULTIPLE products from the restricted ones, use the line below
    //$is_purchasable = in_array($product->id, $allowed_cart_items) || in_array($product->id, $restricted_cart_items);

    // To allow a SINGLE  products from the restricted ones, use the line below
    $is_purchasable = in_array($product->id, $allowed_cart_items);
  }
  return $is_purchasable;
}, 10, 2);

At this stage, we have the code that fulfils the original requirements. However, we need one extra step to make it more elegant.

Step 3 – Explain customers why some products cannot be purchased anymore

As we have seen, the code in step 2 prevents some products from being added to the cart if Product X and/or Product Y are already present, but it doesn’t explain customers why. We just need to show them a message with some information about the restrictions, to make things clearer.

// Step 3 - Explain customers why they can't add some products to the cart
add_filter('woocommerce_get_price_html', function($price_html, $product) {
  if(!$product->is_purchasable() && is_product()) {
    $price_html .= '<p>' . __('This product cannot be purchased together with "Product X" or "Product Y". If you wish to buy this product, please remove the other products from the cart.', 'woocommerce') . '</p>';
  }
  return $price_html;
}, 10, 2);

Step 4 – Combining the code

For the snippets above to work together, we must combine them in the correct order. More specifically, the code from step 2 should go inside the code from step 1. Here’s the complete code, ready to be pasted in the functions.php file: http://pastebin.com/BRU1BP2E.

Update – 01 March 2018

We prepared an example of how the code can be adapted for WooCommerce 3.x. You can find the code here: https://pastebin.com/tRbJKt37.

Step 5, 6, 7, etc – Improvements

The above solution is fully functional, but it would be possible to make it more elegant and flexible. Further improvements to the code could include the following:

  • Packaging the code as a plugin. This will help avoiding global variables and could make the code tidier and easier to read.
  • Adding support for groups of restricted products (e.g. Product X and Y or Product A and B, etc).
  • Adding a dynamically generated message, showing exactly which restricted products are in the cart, instead of relying on static text.
  • Adding formatting to the message displayed to the customers.

Should you need assistance adapting the solution to your needs, or implementing any of the above optimisations, please feel free to contact us. We will review your specifications and provide you with a quote for your customisation.

The Aelia Team