Posts

news icon

Aelia plugins – Performance improvements and PHP 8.2 compatibility

In this post, we’re going to discuss the improvements we made to our products to deal with the breaking changes introduced by PHP 8.2, as well as the possible issues that you might encounter. If you’re not familiar with the PHP programming languages and the technical aspects of WordPress and WooCommerce, we recommend to involve your developer to fully understand the topics we will cover.

news icon

WooCommerce 3.0 “Bionic Butterfly” has just arrived!

WooCommerce 3.0, the Bionic Butterfly, is here!

WooCommerce 3.0 is now available for download. This is a great update, which lays the foundation of a more powerful, flexible and scalable e-commerce system, and it will greatly improve the e-commerce experience for millions of merchants and buyers worldwide.

Still, “with great change comes great responsibility”. Yes, the original sentence was slightly different, but it applies nevertheless. The improvements that WooCommerce 3.0 brings can have side effects, therefore we would like to repeat our invitation to being careful with the upgrade.

Below you can find a summary of the information we sent to our newsletter subscribers. We recommend to keep this information handy, as it will make the update process easier and smoother.

What you should do before updating WooCommerce

In the past few weeks, we sent a step by step upgrade guide to our subscribers, describing our recommended way of upgrading WooCommerce. You can find it below, if you missed our email, or if you are not registered to our newsletter.

The most important concept to keep in mind that you should not update your live site immediately. It looks like a tempting shortcut, but we strongly recommend not to do that (you can take our word on this). Instead, you should follow a few simple steps:

  1. Take a full backup of the live site.
    Tip: if you don’t have a strategy for automated backups, we would strongly recommend to prepare one as soon as possible. Please feel free to contact us if you need more information.
  2. Ensure that the backup is usable and ready to be restored in case of emergency.
  3. Create a copy of your site on a staging/test server. Work only on the test copy.
  4. Update all the plugins, except WooCommerce, to the latest versions.
    Note: some updates might not appear in the WordPress Plugins page.You can always get the latest versions of the Aelia plugins from the My Account section on our site.
  5. Update your theme to the latest version.
  6. Update WooCommerce.
  7. Test the site extensively, to make sure that all the plugins you are running, as well as your theme, are compatible with WooCommerce 3.0.
  8. If you spot any issue, contact the authors of the affected plugin or theme before updating the live site.
  9. Apply any fix provided by plugin authors and repeat the testing from step #7.

When you are comfortable that the test site is working correctly, you can repeat the above steps on the live site.

This process may look long and boring, but it’s worth spending some time to double check that the shop will work fine after an update, as that will prevent unexpected crashes and downtimes.

Recommended reading

The WooCommerce Team also wrote a useful article to guide you through the upgrade process: How to prepare your WooCommerce store for any release. We recommend to read it and familiarise yourself with the steps required for a smooth upgrade.

Compatibility status of the Aelia plugins

We updated our plugins to work with WooCommerce 2.7 a couple of months ago, and tested them again with WooCommerce 3.0. Below you can find a list of the plugins that you will have to update before installing WooCommerce 3.0, together with their version number and release date:

Our tests showed that plugins such as Shipping Country, or the Blacklister, should already be compatible with WooCommerce 3.0. We will keep reviewing them as updates for the new version are released, to ensure maximum compatibility.
Of course, should you find any issue, please report it, and we will look into it as soon as possible.

Important
Our licensing system is still undergoing maintenance, and you might not receive an update notification in your WordPress Admin Panel. We would recommend you to follow our our site, our Twitter account or our Facebook page, where you will find the information about new releases there. You will then be able to download them from our site, or from the download link you received with your email.
Once our licensing system will be back up, you should start receiving update notifications from within WordPress.

Need assistance, or have any questions?

Should you need help, or have any questions about our plugins and how to update them before installing WooCommerce 3.0, please get in touch. We will get back to you as soon as possible, with the information you need.

Thanks for your time, and have a great day and an amazing weekend!

Sincerely,

Aelia – The Internationalisation Experts

news icon

WooCommerce EU VAT Assistant – Make VAT number optional when cart total is zero

Recently, we have been asked for a customisation for the EU VAT Assistant, to cover the following scenario:

  • The VAT number should be required to complete a purchase, if a payment has to be made.
  • The VAT number should not be required if the checkout doesn’t require a payment (i.e. if the cart total is zero). This could be the case if the customer only adds free products to the cart.

The above scenario is outside the scope of the EU VAT Assistant. The purpose of the “VAT number required” option is to force only B2B transactions. By making the VAT number required, only verified businesses can complete a transaction. By design, this rule applies whether the transaction requires a payment or not.

If you need to make the VAT number required only when a payment is needed, you can easily do so with a customisation. Your custom code will have to cover two elements:

  1. The validation of the VAT number on the checkout page
    When the field is set as “required”, the customer cannot go ahead with the checkout until such field is filled. For this part, we will rely on JavaScript to show or hide the VAT number field dynamically, as well as making it required, or not required
  2. The validation of the VAT number during the checkout process
    For this part, we will use a simple filter to verify if the VAT number should be required during the final checkout phase.

Now we have a plan, let’s get started.

Step 1 – Expose the cart total to the JavaScript frontend

The cart total is not easily accessible via JavaScript, as it’s not stored in the data returned by the Ajax requests triggered on the checkout page. Luckily, there is a convenient  filter that will allow us to add that information, called woocommerce_update_order_review_fragments. Our filter will be the following.

/**
 * Adds the cart total to the fragments returned as a response to the Ajax
 * requests on the checkout page.
 *
 * @param array fragments The fragments returned as a response.
 * @return array
 */
add_filter('woocommerce_update_order_review_fragments', function($fragments) {
  $fragments['_cart_total'] = WC()->cart->total;
  return $fragments;
});

Done. Now, every time the checkout form changes, we will have the cart total handy.

Step 2 – Get the cart total from the fragments, via JavaScript

Now that we have the cart total exposed to the JavaScript on the checkout page, we can use it to show or hide the VAT number field, as well as change its “required” status. For that purpose, we just have to add a simple script to the page footer.

/**
 * Adds a script to the checkout page, to make the VAT number required or not
 * required, depending on the cart total.
 */
add_action('wp_footer', function() {
  // We need to render our script only on the checkout page
  if(!is_checkout()) {
    return;
  }
  ?>
  <script>
  jQuery(document).ready(function($) {
    // Run the script every time the checkout form is updated. This will
    // allow us to check if the total changed
    $(document.body).on('updated_checkout', function(ev, data) {
      if(!data['fragments'] || !data['fragments'].hasOwnProperty('_cart_total')) {
        return;
      }

      var cart_total = parseFloat(data['fragments']['_cart_total']);
      var vat_number_required = (cart_total > 0);

      var $eu_vat_number = $('#woocommerce_eu_vat_number');
      // Show the VAT number is the cart total is greater than zero,
      // hide it otherwise
      $eu_vat_number.toggle(vat_number_required);
      // Make the VAT number required only if the cart total is greater than zero
      $eu_vat_number.find('.form-row').toggleClass('validate-required', vat_number_required);
    });
  })
  </script>
  <?php
});

With this script, we covered the checkout page. The VAT number will appear automatically when the cart total is greater than zero, and disappear when it’s not. Customers will be able to checkout without entering a number, if no payment is needed.

Step 3 – Make the VAT number optional during the checkout process

This is the last step, to allow the checkout to complete when the cart total is zero and the customer did not enter a VAT number. This filter is very simple.

/**
 * Sets the VAT number field as "not required" when the cart total is zero (or
 * less; which should never happen, but better to cover that case).
 *
 * @param bool is_vat_number_required Indicates if the VAT number is required.
 * @param string country The billing country selected at checkout.
 * @return bool
 */
add_filter('wc_aelia_euva_order_is_eu_vat_number_required', function($is_vat_number_required, $country) {
  // Make VAT number "not required" if the cart total is zero
  if($is_vat_number_required && (WC()->cart->total <= 0)) {
    $is_vat_number_required = false;
  }
	
  return $is_vat_number_required;
}, 10, 2);

That’s it. We covered the checkout process as well. The result will be the following:

  • When the cart total is greater than zero, the VAT number will be required. It won’t be possible to complete the checkout without entering it.
  • When the cart total is zero, the VAT number will be hidden, and optional. Customers won’t need to enter it.

You can find the complete code here: WooCommerce – Make VAT number optional if cart total is zero (Pastebin).

Need help?

Should you need assistance adding this custom code to your site, or if you need it tailored to your needs, you can hire us on Codeable. We will analyse your specifications and send you an estimate for your customisation.

Thanks for reading, and for using our EU VAT Assistant. See you soon for the next WooCommerce Tips & Tricks!

The Aelia Team

news icon

Happy new year! Time to update VAT rate for Romania

Happy new year to you all! We hope you had some great Christmas time, and that you are ready for a great 2017. Considering how 2016 went, it can only get better!

The new year starts with a good news for our Romanian friends. As announced last year, the Romanian government reduced the standard VAT rate from 20% to 19%, from the 1st January 2017.

This means that your products will be slightly cheaper. It would be a good idea to update your tax settings as soon as possible.

How to update the tax rates

Updating tax rates is a simple operation:

  1. Go to WordPress Admin > WooCommerce > Settings > Tax.
  2. Click on the tax rate you would like to update (e.g. “Standard“), at the top of the page.
  3. Change the rate in the row with the country code “RO” to “19”.
  4. If needed, update the tax rate description.
  5. Save the changes.

Now all that’s left is double checking that all tax rates are correct. Our plugin updates the rates related to EU countries, therefore you will have to check the rates that refer to countries outside the European Union. If you don’t have any, then you’re done. WooCommerce will now use the new rates for orders placed from now on, and our plugin will collect the tax data automatically.

Again, best wishes for an incredible 2017 from the Aelia Team. May the new year be full of joy and, of course, business opportunities!

The Aelia Team

news icon

EU VAT rate update – Greece

We have recently been informed that the standard VAT rate for Greece was changed on the 1st June 2016, from 23% to 24%. Some changes were made to reduced VAT rates as well.

We would recommend to take the opportunity to update the VAT rates configured in your system, to make sure that you are using the correct ones.

How to update the tax rates

Updating tax rates is a simple operation:

  1. Go to WordPress Admin > WooCommerce > Settings > Tax.
  2. Click on the tax rate you would like to update (e.g. “Standard“), at the top of the page.
  3. Change the rate in the row with the country code “GR” to “24”.
  4. Save the changes.

If you are using our EU VAT Assistant plugin, you can update all EU tax rates with a single click. Simply select the rate type at the bottom of the page and click on Update EU VAT Rates. Make sure that you select the appropriate rates (Standard or Reduced), the plugin will do the rest.

WooCommerce Tax Rates Settings - Screenshot

With our EU VAT Assistant you can update all VAT rates with a single click

Once the operation is completed, review the tax rates, to ensure that they are correct, and click on Save Changes. WooCommerce will now use the new rates.

Quick and easy! 🙂

The Aelia Team

news icon

WooCommerce and cache – Part 2: new Cache Handler plugin

Read Part 1: WooCommerce Currency Switcher and cache – Making them work together

Some months ago, we wrote about one of the most common issues faced by merchants who run highly dynamic websites, which include multi-currency, multi-pricing, geolocation features: stale content served by rigid caching systems.

In brief, there are quite a few caching systems designed with the assumption that the content of a site is the same for anyone. No matter who is opening a page, they serve the same information. This is correct for relatively static sites, such as blogs, which show the same articles to every member of the audience, or simple e-shops, where the prices are set, and are the same for every customer.

In a few words, many caching systems assume that, given a page on a site, the content of such page will always be the same, without exception. As we explained, this is incorrect when a site is highly dynamic. A shop that handles multiple currencies may be showing different prices to different visitors, or it might need to show a different tax rate (this is actually a requirement in many countries), on the exact same page.

With a static caching system, the result is that users may end up seeing the wrong content. This makes for a worse user experience, and can have an impact on conversion.

After an in-depth analysis, and several experiments, we came to a conclusion: issues caused by the caching system must be solved by the caching system. Based on this approach, we prepared an algorithm for dynamic caching that handles the needs of a multi-currency, multi-pricing, multi-language shop as it should, without compromising on the performance. This, in our opinion, is the correct way to address the issue.

The status of Dynamic Caching today

We keep contacting as many hosting providers as possible, explaining them how they should update their caching systems to bring them up to speed. Our objective is to make it clear that handling highly dynamic caching is a must, not just a “frill”.

Quite a few providers agreed with our approach, and allow their customers to customise the caching logic as required. Others, like the WP Engine team, showed interest in our solution, and are currently reviewing it, for future implementation. There are some who are still “lagging behind”, and there are a few, such as CloudFlare, who only offer dynamic caching on their most expensive plans.

Due to these limitations, imposed by an obsolete architecture, merchants have make a difficult decision:

  • Change hosting/service provider and move to one that handles caching as it should. This would make sense, but it’s not always possible. Besides, merchants might have invested a significant sum in current service.
  • Disable the caching system they are using, and for which they might have been paying a service fee.
  • Abandon the idea of a multi-currency, multi-language site, potentially risking to drive away audience.

While we still maintain that caching issues must be addressed on the caching layer, we wanted to find a solution that would help merchants, at least temporarily, while the service providers update their system.

Welcome our new plugin: WooCommerce Cache Handler

Thanks to our customers’ support, we are happy to announce the release of the WooCommerce Cache Handler plugin (currently in Beta stage). This new plugin can be used as a workaround with rigid caching systems, such as CloudFlare, SiteGround “Dynamic” Cache (which is actually static), as well as plugins that don’t support dynamic caching, such as W3 Total Cache.

Please note that our recommendation is still to consider switching to a more flexible solution, but this plugin will cover you until you are ready for that change.

How it works

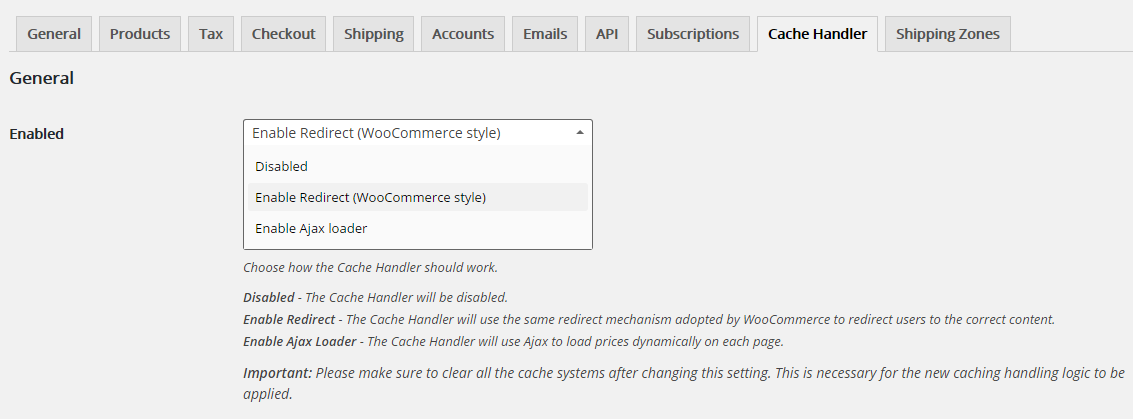
The WooCommerce Cache Handler is simple to use. All you have to do after installing the plugin is go to WooCommerce Settings > Cache Handler and choose the handler you prefer.

WooCommerce Cache Handler - Configuration page

Configuring WooCommerce Cache Handler is extremely easy. Simply choose your favourite handler, clear the cache, and you are ready to go!

After that simple selection, the Cache Handler will support our Currency Switcher, Prices by Country, Tax Display by Country, and all our other WooCommerce plugins.

Currently, there are three options available.

1. Disabled

As the name implies, this disable all the features of the plugin. It can be useful for testing.

2. Redirect

This option is an almost exact equivalent of the “caching support” feature implemented by WooCommerce, which is enabled when the Default Customer Address is set to Geolocate (with page caching support).

The major difference from the standard feature is that our handler takes into account details such as the currency, customer’s country, customer’s state, customer’s tax exemption, and so on, ensuring that the correct content is served to customers based on these parameters. Like the original workaround from which it was derived, this handler appends a random string to URLs.

Benefits and drawbacks

+ The Redirect handler is based on the original workaround implemented by WooCommerce.
+ This solution works on a page level, thus it can produce the correct content with any configuration, or 3rd party plugins.
– The URLs look “ugly”, due to the string appended to them to work around the limitations of caching.

3. Ajax Loader

The Ajax Loader is an alternative to the Redirect, and it’s more elegant, as it doesn’t alter page URLs with ugly, random text. This handler loads all pricing elements via Ajax, when the page load is completed. The result is the following:

  1. A visitor connects to your site from the US. He would like to see USD.
  2. The rigid caching system has the page cached in EUR, and serves it to the customer.
  3. The Ajax Loader kicks in as soon as the page is loaded, requesting the updated prices from the server. After a brief moment, all elements that were displayed in EUR are changed to USD, as the visitor would expect.This update is very quick, and, at the moment, it processes the following standard elements :
    – Product prices
    – Currency selectors
    – Price filter widget
    – Custom prices displayed with the Currency Switcher shortcodes.

Benefits and drawbacks

+ The Ajax Loader is a more elegant solution than reloading the page after appending a random string to the URL.
+ Page load is faster, as there is no redirect.
+ URLs are not altered. There is no random text appended to them.
– The Ajax Loader can only process standard elements on the page. If 3rd party plugins add their own pricing elements, such addon prices, custom totals, etc, those won’t be updated. It will be up to the 3rd party plugins’ authors to “hook” into the Ajax Loader and refresh their elements via Ajax.

How to get the WooCommerce Cache Handler

The WooCommerce Cache Handler is available free of charge. Please feel free to download and try it, and see how it works for you. Whether you are using CloudFlare, SiteGround, WP Engine, Flywheel, or any other service with static caching, the Cache Handler got you covered!

Questions? Feedback?

The Cache Handler is still in Beta stage and that, as any free plugin, it’s not covered our free support. We would recommend to try it on a staging copy of your site, so that the live site won’t not affected by bugs that we eventually have to address.

We also would like to encourage you to share your feedback by contacting us. If you wish to contribute to the development of this plugin, you are more than welcome to do so!

Thanks for reading, and see you soon on aelia.co!

The Aelia Team